NOTE: RS3 Has been discontinued. See the RS3x
These instructions are for RS3 units built after August 2019. These units will have a white UART connector on the PCB board next to banks S4 and S5. RS3
Getting Started
To prepare your idChamp RS3 for BLE mode, follow the instructions below.
You’ll need a Phillips head screwdriver and a paper clip or small tool for changing the DIP switches. In order to access all DIP switches, you’ll need to remove the outside case entirely. You can do this by removing the lid, turning the unit over, and gently tapping it out into your hand.
Use the DIP switch table at the end of this page for reference.
Note: If you are having issues with your idChamp RS3 in BLE mode, it could be that the BLE module is in an unexpected state. To reset the BLE module, toggle DIP switch #4 on bank S3. You can also use S3-4 to turn off the BLE module while in HID or SPP mode.
Instructions
1. Power off your RS3 and take it out of its enclosure by unscrewing the four screws, then lifting the lid.
2. Locate the DIP switch banks labeled “S2” and “S3” along the short edge opposite the micro-USB port.
3. Grab a paperclip or similarly shaped object (pens are NOT recommended) and flip the DIP switches up or down to match the image below. If you have problems loading the image, use the DIP switch table.
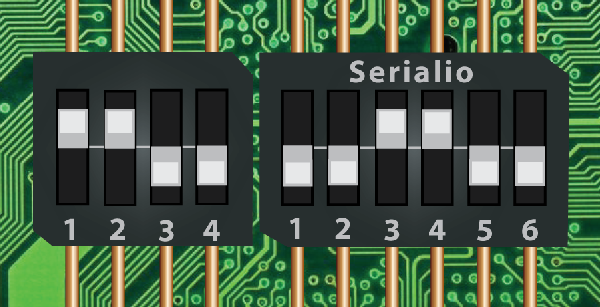
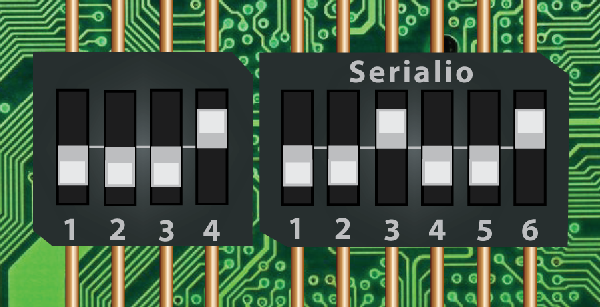
4. Locate the DIP switch banks labeled “S4” and “S5” along the long edge of your RS3. Flip the DIP switches up or down to match the image below. If you have problems loading the image, use the DIP switch table.
5. If you are planning to keep your RS3 in BLE mode, you can put it back in its enclosure now.
6. Power on your RS3.
| 1 | 2 | 3 | 4 | 5 | 6 | |
|---|---|---|---|---|---|---|
| S2 | Down | Down | Up | Up | Down | Down |
| S3 | Up | Up | Down | Down | ||
| S4 | Down | Down | Down | Down | ||
| S5 | Down | Down | Up | Down | Down | Up |
